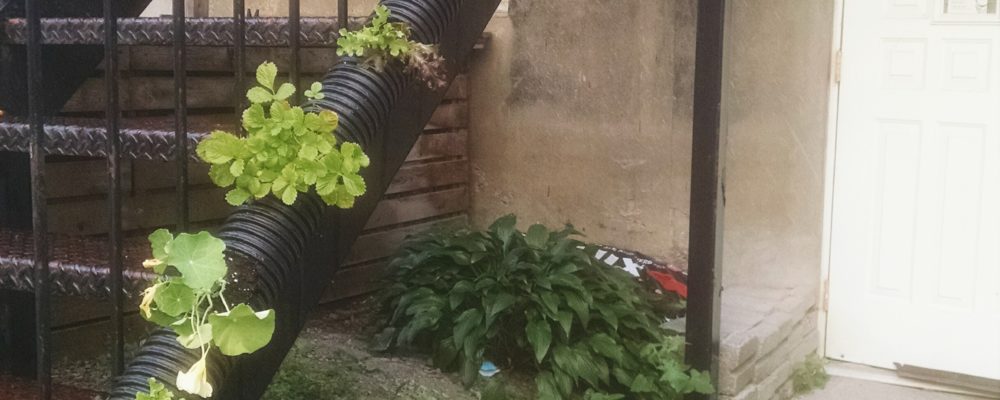
To make up a suspended garden along your staircase might be easier then you think. In one afternoon with two pair of arms, we did the test ouserselves at the Montreal Diet Dispensary as part of one of our greening projects.
Here are what you need and the steps to follow so you can in your turn build one of your own!
Equipment t0 buy
1 non-perforated drain (those sold in hardware stores mesure 10 feet)
1 valve compatible with a hose
1 connexion kit to fix the valve (tube with no screw+screwable slice)
2 joints to prevent leeks
2 caps of 4 inches to cover the drain
1 packet of tie-raps, preferably black
Reusable equipment
2 empty barrels of olives of 20 L each with their covers
1 garden hose of 12 feet
Tools
1 perceuse 1 drill
1 big cylindrer saw (about 4 inches of diameter)
1 little cylinder saw (7/8 inches of diameter)
1 drill bit
1 flat screw driver
Earth and plants
1 bag of potting soil of 30 liters (preferably with coconut fiber)
1bag of « homemade » compost or shrimp based
1 box of hen manure
10 to 12 seedlings (fine herbs, strawberry tree, lettuce, edible flowers, beans… favour small varieties et not to demanding)
Manufacturing steps
Hang the drain along your stairs with tie-raps (to obtain the right lenght, tie two of them together). Pierce several holes in the drain at regular distances with the drill and the big cilynder saw where you wish to grow your plants (think of the possibility to use the banister as a tutor to choose the location of your holes). Clean up the drain to remove any plastic residues.
Pierce the garden hose with the drill and the drill bit. Make sure to make in of holes so the water can flow easily through the potting soil, and only at a distance of 9 feet (so the water does not flow outside of the drain containing the plants).
Pierce in their centers the two caps with the little cylinder saw, then fix both of them to the two endings of the drain after you have passed the garden hose through the holes you just made.
Place the 2 barrels at each end (one will serve as a water reserve and the other as a water recuperation barrel).
Pierce the one at the top with the little cylinder saw et install the valve with the connection kit (at the base of the barrel, to take maximum profit from the water reserve). If leaks appear after, use mastic to seal your installation.
Screw the garden hose to the valve.
Pierce the cap of the barrel at the end of the drain with the little cylinder saw and insert the bit of the hose that is exceeding the drain (cut it, if needed).
Think of piercing an overflow hole with the drilling bit at the top of the barrel.
Mix the potting soil and the compost (60% potting soil, 40% compost). Insert the mixture into the holes in the drain, beginning with the ones at the bottom and compacting it lightly.
Transplant your seedlings as you go, making sure that the roots are well surrounded by the mixture.
Humidify the mixture around the plants with a watering can.
Next, fill the water reserve and slightly open the valve to make up a self-compensatation drip irrigation emitter.
Recover the overflow in the barrel of the bottom et put the water in the one at the top.
You will not only be able to enjoy fresh fruits and vegetables all summer, you will collect the smiles of your neighbourhood and show of your stairs with pleasure!


